When it comes to enhancing your outdoor space, installing pavers is an excellent option. Not only do they enhance your space’s aesthetic appeal, but they are also really durable and can withstand heavy traffic and harsh weather conditions. There are many benefits to using pavers for your outdoor spaces, but before you can enjoy all of them, you’ll need to install them first.
Installing outdoor pavers requires careful planning, attention to detail, and a bit of elbow grease. Although pavers are relatively easier to install compared to its counterpart, you might still find it difficult if this is your first time doing it. No worries though, this guide will walk you through the essential steps in paver installation. Whether you’re a DIY enthusiast or an experienced all-around handyman, knowing the proper steps in paver installation is essential. So read on if you want to know more.
Step 1: Planning and Design
Before you even think of purchasing materials for your project, you’ll need to have a clear plan. You’ll need to know every detail of the area you’re planning to install pavers on to make the right purchases. Planning will also help you visualize and decide on the design and pattern you want for your outdoor space. When planning, you’ll need to consider several factors like the location, the purpose of the space, and how you want it to look. Each of these factors can influence the type and style of pavers you choose for your project.
Step 2: Purchasing Materials
Once you’re done with the planning phase and you have a clear vision of what you want to achieve. It’s time to go out and buy the necessary materials. You’ll want to do some research on the necessary materials for your outdoor paving project. Ask your local supplier about this, they will be glad to help you out. For starters, here’s what you’ll need to buy. Of course, you’ll need to buy the paver itself, along with base materials such as crushed stone or gravel, bedding sand, and joint sand. You may also want to consider purchasing a sealant to protect your pavers after installation.
Step 3: Preparing the Site

So you’re done with your plan, you’ve purchased your materials, and now it’s time to prepare the side. In this next step, you’ll need to prepare the area you’ll be installing the pavers by first leaning it off and making sure no debris will be in the way of the installation. You’ll need to mark out the areas with stakes and string, then excavate them to the proper depth. This will depend on how thick your purchased pavers are and your intended use whether it be for vehicle or foot traffic. Don’t forget to add a slope slightly away from any structures for proper drainage.
Step 4: Installing the Base
This step is necessary to ensure stability and proper drainage. The base is typically a layer of crushed stone or gravel. Make sure to thoroughly compact this layer with a plate compactor to create a solid base for the pavers. Make sure that the base is as flat and as even as possible before proceeding to the next step.
Step 5: Laying Bedding Sand

After preparing the base, you’ll need a layer of bedding sand on it before you lay the pavers down. Make sure that the sand bedding layer is even and uniform in thickness. This is crucial since this will influence the final look and stability of the pavers.
Step 6: Laying the Pavers
Once all the previous steps are done, you are now ready to lay your pavers. This is where your design planning comes in handy. When laying down the pavers according to your design, try to lay them on a straight edge and ensure that they are snug against each other. Don’t worry too much about the gaps too much as they will be filled with sand later on.
Step 7: Cutting Pavers
You might notice that as you lay your pavers down close to the edge that some of them need to be cut to fit the edges. This can be done with a hammer and chisel or a masonry saw. Be careful when cutting pavers. Be sure to wear safety goggles and gloves to avoid accidents.
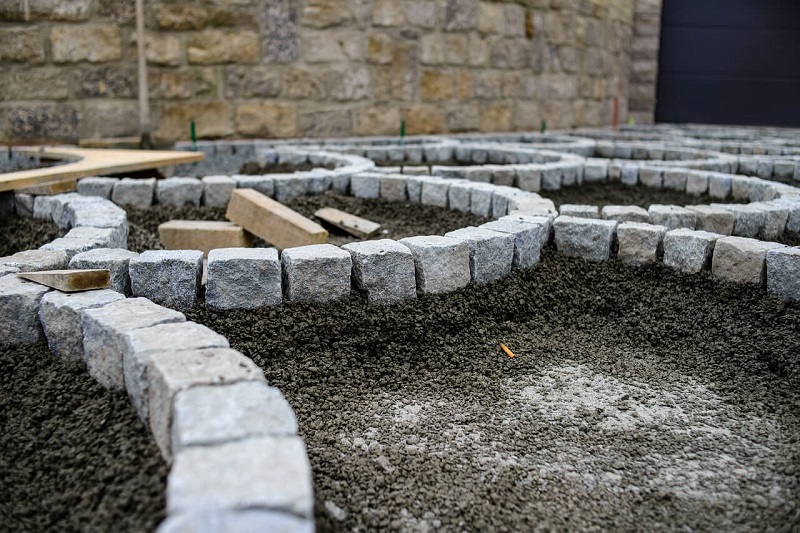
Step 8: Installing Edge Restraints
This is one of the most important steps in paver installation. Edge restraints keep pavers in place and prevent them from shifting over time. You can make edge restraints using various materials, just remember to use sturdy ones and that they are properly installed to ensure that they last a long time.
Step 9: Filling Joints with Sand

Once you have the edge restraints in place, you can now fill the gaps between the pavers with sand. This will help lock the pavers in place and enhance their strength and stability. You may need to do this a few times to ensure that all the gaps are thoroughly filled.
Step 10: Compacting and Sealing
You’re finally down to your last step. You’ll need to compact the pavers to settle the joint san and ensure a level surface. You can do this using a plate compactor. Once you’re done compacting the pavers, you may apply a sealant on them. Sealing pavers adds an extra layer of protection from wear and tear and may also enhance the paver’s colour.
Congratulations! You’re now done installing pavers to your driveway, patio, or walkway. As you can see, there are many steps in paver installation and each one requires careful attention to detail. And while the process may be time-consuming and labor intensive, the result is well worth it.
While anyone can follow these steps and install pavers on their own, some may not be as confident with their skills. If you’d rather leave the work to the professionals or if you need advice on a paver project, The Concrete Painter is here to help. We specialize in all forms of paver and concrete cleaning, colouring, and resealing to give your outdoor space a fresh new look. We have over twenty years of experience in the business and have completed more than 4500 jobs in both residential and commercial properties. If you need help in paver installation, don’t hesitate to contact us. At The Concrete Painter, no job is too big or too small.